In the not so recent past, there was only one dominant way how one treated a video game. One sat and played. Or maybe have an old pal buddy up to help you survive longer and complete missions faster. However, it was still pretty far from what one could label as a “Spectator Game.” Reportedly, the scenario has changed significantly over the years, courtesy gamers on YouTube and the racing popularity of e-sports and of course Twitch-the one of a kind game streaming service that has gained widespread recognition in no time. To fire a stream and witness somebody playing miles away from you is now a fully recognized way to enjoy watching a game.
While that sounds fun, sometimes it can be of grave distress, when in some areas of the world, you might face prompt blocking access to the content of the site. A quick fix of those issues might be routing your connection through a VPN client. You can give a try and install a free vpn on your device. Although having limitation,a free VPN will help you tunnel the traffic via a remote server, as a VPN helps access a site from a different IP altogether. Such spoofing of the location not only allows access to blocked content but also renders complete anonymity. If it works for you, consider getting a premium subscription, to get a wider bandwidth and better speeds.
Basic requirements
For starters, you need a sturdy PC with a well-defined graphics card to help allow stream games without any lag. This is important because you will find yourself running as well as uploading video and audio simultaneously. Twitch experts often resort to using a dual PC setup to help achieve this where one PC is kept for streaming and the other for gaming. However, it requires a complex run through and is never recommended for anyone who is just starting. Let’s start by taking a look at the PC requirements:
- Processor: Intel Core i5-4670 or AMD equivalent
- Ram: 8GB
- Graphics: DirectX 10 compatible. For modern games, Direct X 11 and 12
If you have a high-end PC configured, Twitch services will perform better. Besides PC requirements, the other important thing is your Internet connection. The official broadcasting guidelines of Twitch requires one to reach just about 4,500-6,000 kbps to achieve 1080p at 60 frames per second as well as 3,500kbps-5,000kbps for 1080p at 30fps.
Introduction to OBS Studio
Before you start broadcasting with Twitch, you will need to get your hands on to two more things:
- A desktop software that is capable of recording and streaming live footage from your PC
- An official Twitch account.
Let’s start with the software part first. Although the website is filled with several reviews regarding OBS studio (Open Broadcaster Software), it is seemingly that one program that is not only free but also relatively easy to set up. Additionally, it also functions to integrate with Twitch without any hassle.
After you have downloaded and successfully installed OBS Studio, the client will launch automatically following which you will be greeted with a window carrying a letterbox screen (empty) and another options screen right at the bottom. Now, you will have to go ahead with setting the scene as well as the source for the broadcast to take place. A majority of Twitch streams are not only a game screencast but combines a string of sources in the shape of picture-in-picture, screen overlays, watermarks and much more. The four basic of such sources include:
- The webcam
- The game
- Player audio
Setting up the Game Stream
- Before setting up the game stream, you will need to rename the screen by the right-clicking scene that is present in the left panel along the bottom part of the OBS window. Now, you can go ahead adding the game feed. Start the game and once you have it running press Alt & Tab to navigate right back to the OBS window. In case, you are proficient using multiple monitors; you may have the OBS studio running in the secondary monitor when the setup is under progress.
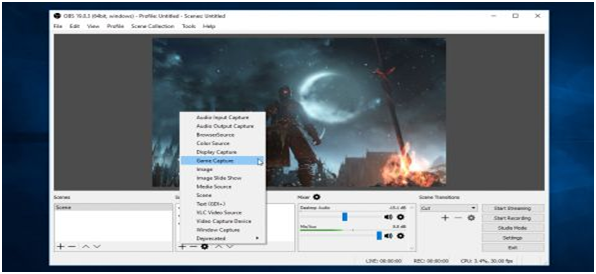
- Soon after, you will need to “Add a New Source.” Click “+” sign right along the “Sources” panel and then move on to select Game Capture from the menu. It will pop open a new window and as you click “OK” it will open up a new third window.
- Once you add the game from the properties window, select the drop-down menu which is right next to the Mode and then selects “Capture.” Next, choose another drop-down menu right to the exe file o the game which will be listed there, as it is already running following which there will be a preview appearing and surrounded by a thin red line.
Setting Webcam Feed
For streamers using Twitch, using a webcam is a pretty standard thing that one does. Here’s how to go about setting it rightly:
- Click “+” sign from the Sources box.
- Select “Video Capture” device from context and Click OK to move on to properties.
OBS studio chooses one’s webcam automatically. You can try and tweak around the associated settings, but as long as your webcam tops the list, everything should be working just about fine. Just make sure to set the angle of the webcam and the lighting in the room.
Setting up the Microphone
OBS goes on to add a microphone by default. However, if you have an additional microphone, you will need to specify which one you want to select as an output source. You can mix your audio scores right from your dashboard.
- Go to “Mixer”
- Select Mic/Aux entry
- Click “Settings “at the far right which brings up a properties box from where you need to select your microphone.
Streaming in Twitch
- Twitch setup is as easy as it goes. All you need to do is to create a user account. Then, select your user name and go to “Dashboard.” Next Click on “Settings” and the following window should lead you to an option called “Stream Key.” Click to choose the same and then click “Show Key.” Do copy the code to the clipboard.
- Now, pull open OBS and click Settings to select the Stream. Choose “Twitch” from the list of streaming services. You might need to choose a server manually if the system doesn’t give you a preselected one. Next, you need to copy the streaming key to the “Stream Key” field and hit Apply and then OK to complete the process.
- Next, go to the Twitch Dashboard and click Live. Next, enter a Streaming title and the game name and Click Update Information to go Live.
As you move back to the desktop. From the OBS window, click on Start Streaming and Voila! You are done!
TOP ALTERNATIVES
 World Route Free Download
 EXE Explorer 1.4.9 Free Download
 Download Windows Phone Recovery Tool Free
 UsbFix 2016
 Autopsy 4.2.0 Free Download
 Download Port Scanner Free
 Apowersoft ApowerUnlock 2020 Free Download
 YouTube Movie Maker Platinum 2020 v18.56
 Intel Quartus Prime Pro 2020
 WINSOFT Barcode 4.5 Free Download