Did you know that almost 80% of people these days watch videos on mute? This is called the 80% rule. Social media creators these days keep this fact in mind and make sure to add subtitles or captions to their videos.
After all, if 80% people watch videos on mute, you have less chance of hooking them with whatever audio you added to the video. Especially for videos with talking-heavy scripts, having captions can engage them continuously.
If you’ve just learned this and you want to keep up with this trend of adding captions to videos, then read through this article. We’ll introduce you to one of the current best options for auto captions and subtitling: Wondershare Filmora.
Part 1: How Subtitles Help in Improving Engagement
Given our premise earlier, that 80% of people now watch on mute, subtitles now act not just as an accessibility feature but also as an engagement tool. If you’re curious how this works, here are some reasons why subtitles help in improving engagement for most creators these days:
- Understand that most people use apps like Reels or TikTok to consume content. People scroll quickly across different videos. That’s why the first three seconds are crucial. Good and eye-catching captions that give a glimpse of your video can give you engagement.
- Captions also help viewers understand videos where the audio is quite chaotic, or when the speakers have thick accents that are hard to understand for the average watcher.
- Lastly, captions make it easier to share specific moments of your video via screenshots. This means that viewers can take a screenshot of your video, share it with others, and then it will pique their curiosity, resulting in more views.
Part 2: Preparing Your Audio for Clean AI Auto-Captions
Now that you know what makes adding subtitles to your video so valuable, let’s see how you can prepare your video or audio for AI auto captions. After all, our goal here is for you to make use of AI tools. Transcribing videos manually can, after all, be a lot of hassle.
The key here is to remember that AI is only as good as the audio you give it. So, most of these tips will focus on improving your audio quality:
- Use a dedicated mic and a good studio. This will help minimize the background noise, which can give the AI a hard time.
- Next, talk clearly or record someone who talks with good clarity. AI understands better if there is less mumbling.
- Make sure to also add a brief silence at the start and at the end. This helps the AI understand what the ” room tone is.”
- Use an “AI Speech Enhancement” tool, such as those in Filmora. This will help reduce background noise and other sounds like hisses.
Part 3: How To Use Filmora’s AI Speech-to-Text and Auto Caption Functions
Now, let’s begin creating your auto captions with the help of Wondershare Filmora. As mentioned earlier, this tool is one of the best options out there because its AI auto caption tool uses the latest technology. It removes the “grunt work” necessary for subtitling before, and makes it easier to generate captions. This means that you can focus on churning out content.
To begin with Filmora, follow the steps below:
Step 1: Create a New Project from the homepage. Then, import a video into the timeline.
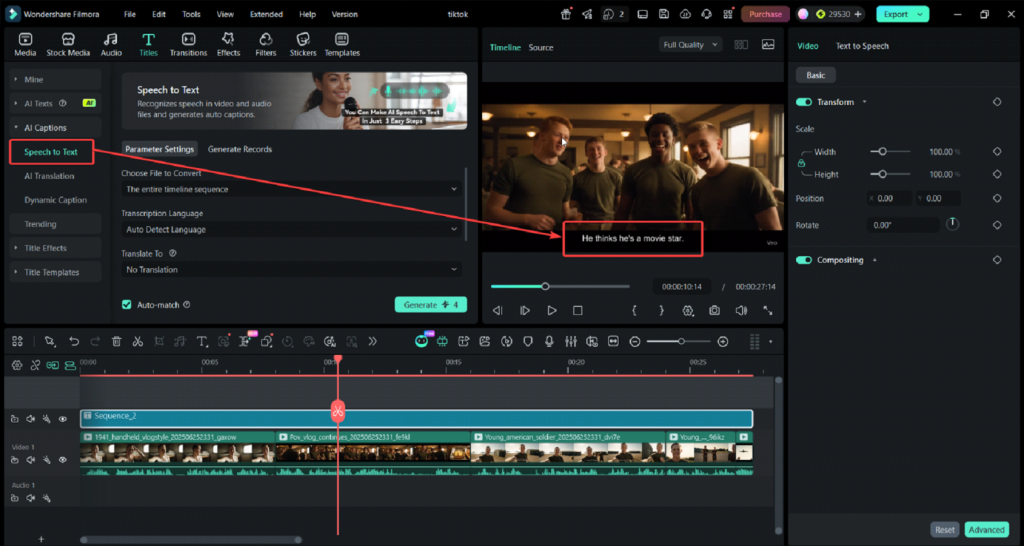
Step 2: Select the clip from the timeline. Then, go to Audio > AI Captions > Speech to Text.
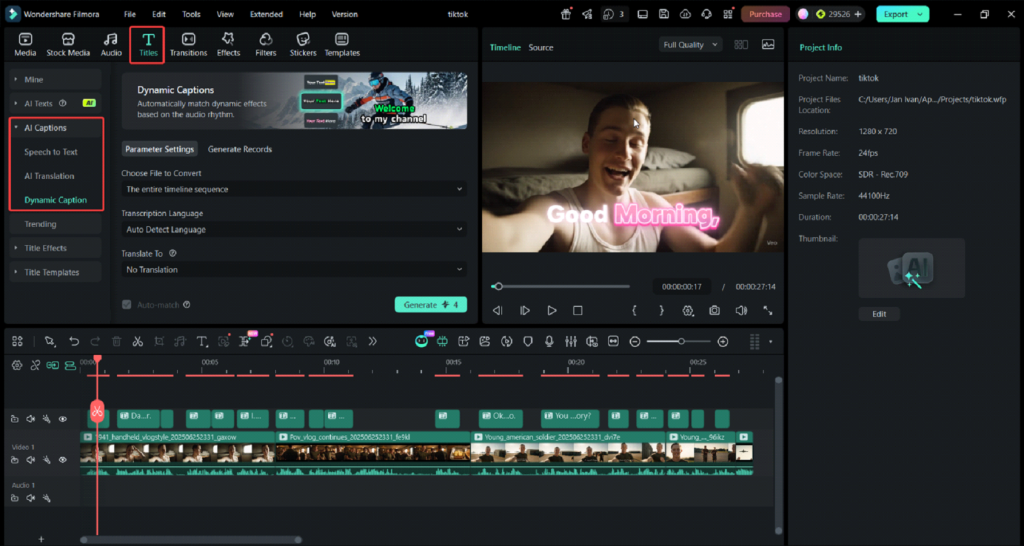
Step 3: A parameter setting window will appear. Here, you should set the following:
- Language of the audio to be transcribed. Determine first the language spoken in your video. Currently, Filmora supports 45 languages.
- Language to be translated to. This one should be set to No Translation if you just want to create subtitles for the spoken language in your video.
- Select the file to be converted. You can either use the selected clip via Clip selection or the entire timeline sequence.
- Presentation of output on the timeline. You can either generate an SRT file or add the subtitles directly to the video by using the Titles option.
Step 4: Once done, export your content accordingly.
Part 4: How To Make Your Subtitles or Captions a Lot Better
Generating subtitles is one thing. Making them attractive or engaging for your audience is another. Here, let’s see how we can make your auto captions or subtitles pop a bit more for social media content.
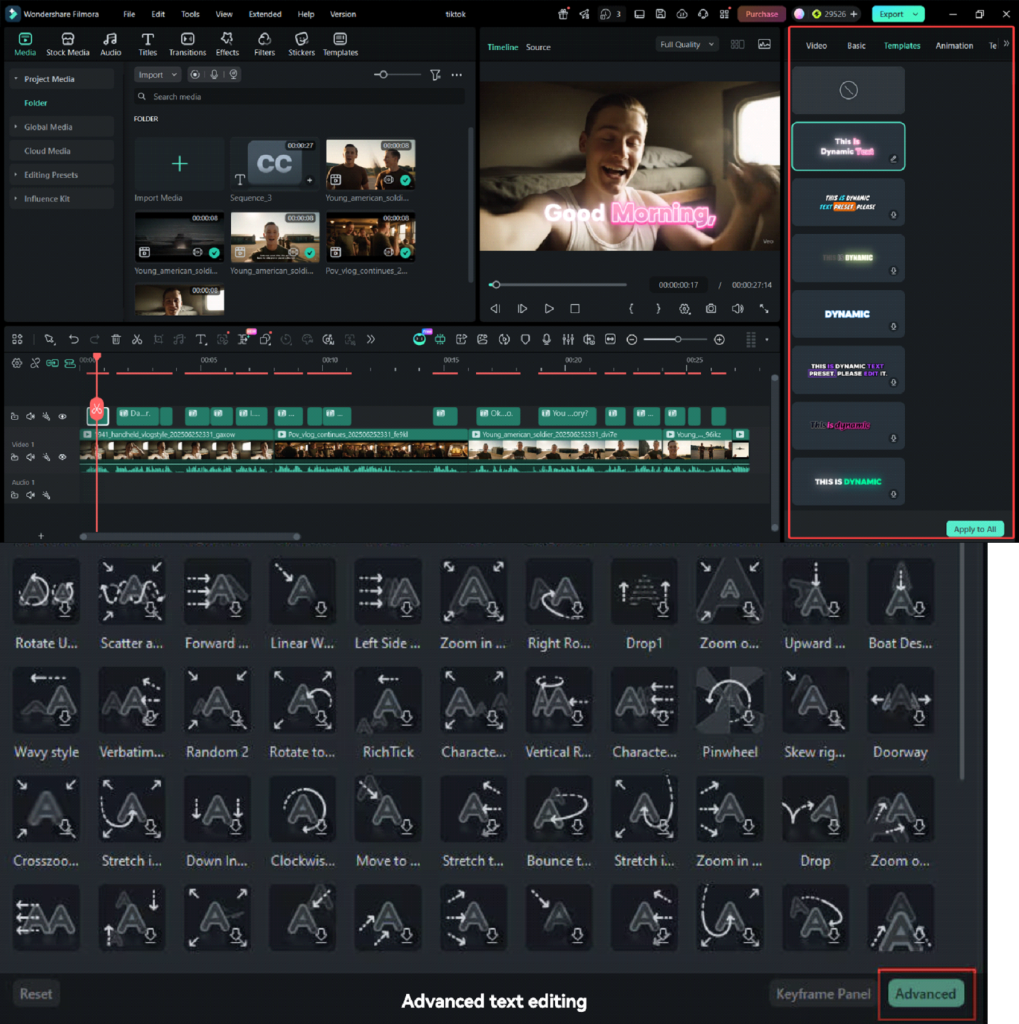
Using Dynamic Captions and the 68+ Animated Caption Styles
In Filmora, instead of generating using the Speech to Text function, you can use the Dynamic Caption tool. This lets you create those captivating captions that are more stylish than regular subtitles.
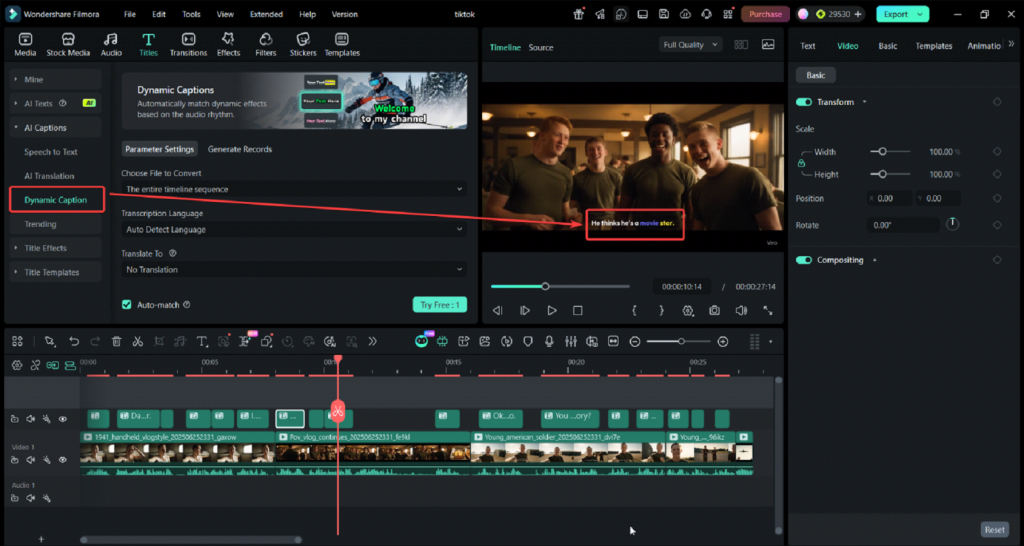
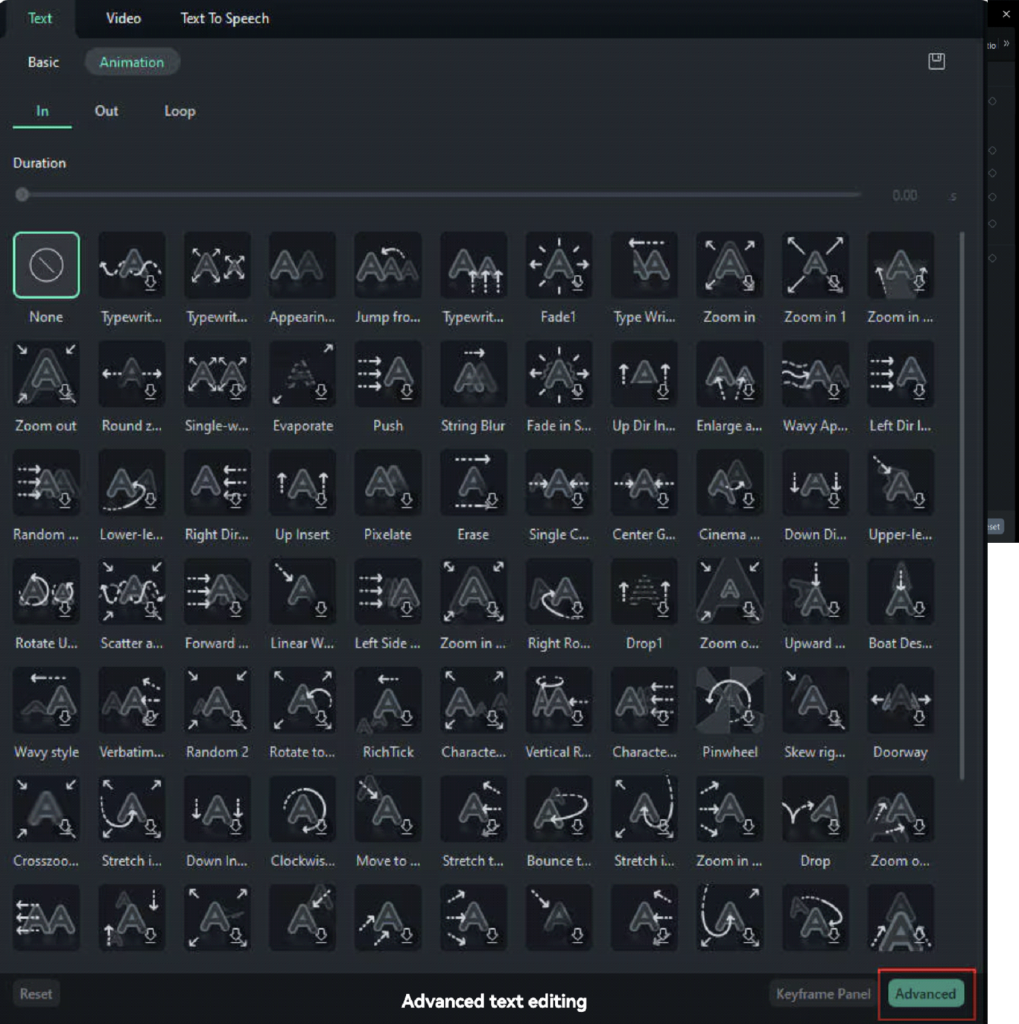
To further edit each of the text elements, double-click them to bring up the editing menu. This will bring up the 68+ Animation and Basic templates that you can use to further improve your captions.
Editing Subtitles by Batch
Since Filmora generates subtitles separately, it might be stressful to edit each one individually, especially if you’re dealing with a long video. You can edit several text elements at the same time by clicking on the layer of the subtitles or Ctrl + Clicking the elements you want changed and using the tools on the right-hand panel.
Note: Animations, templates, and other text styles are also available from the right-hand panel.
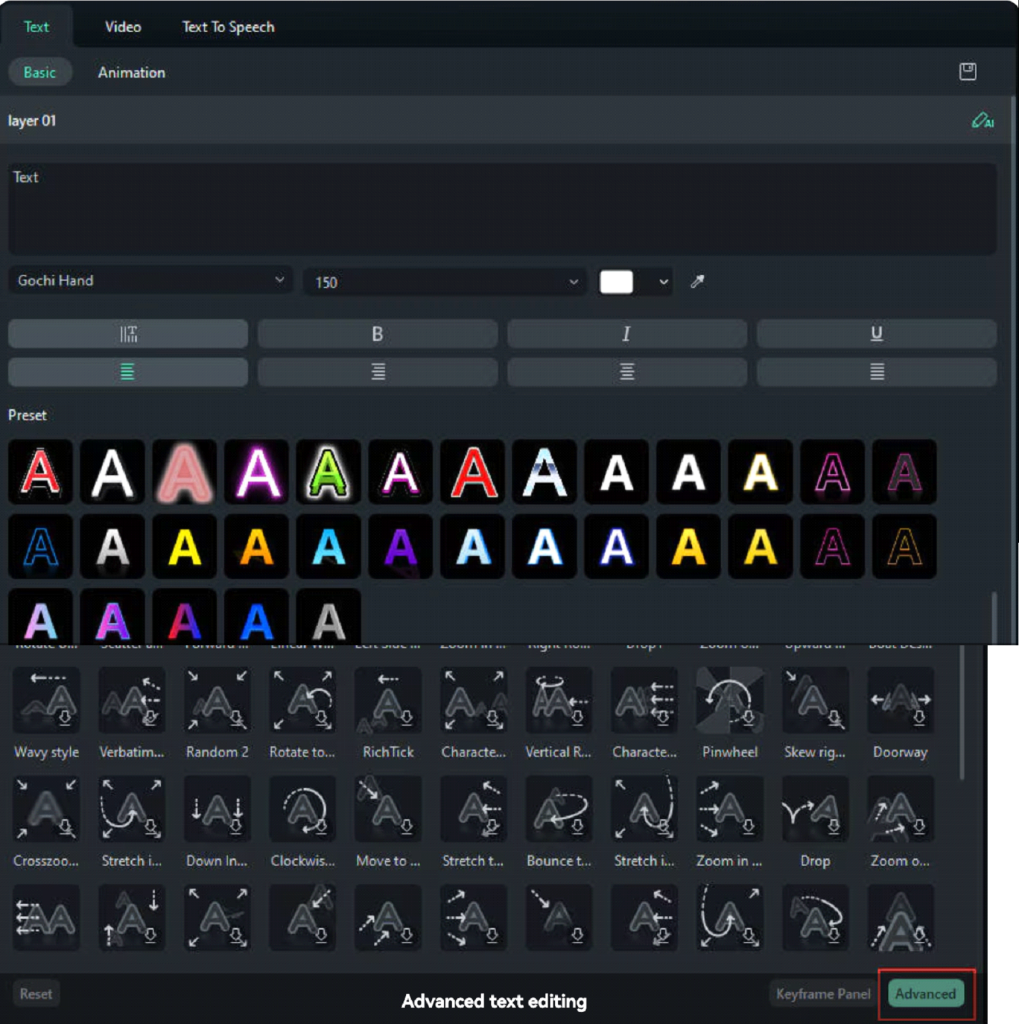
Editing Your Subtitles Manually
At times, there might be some words that the AI doesn’t understand, such as unique brand names or jargon. Be sure to check each subtitle element individually to make sure that the words are correct.
To do this, Double-Click on an element again. Use the text box (in the picture, it’s marked as “layer 01” to edit the content.
Part 5: Bonus Tips for Using Subtitles
After learning all about auto captions, subtitles, and how you can use them to improve your social media content, here are some more tips that we think can be helpful as you use them.
Translate Your Captions for a Wider Audience
In the Filmora app, you can make use of the 23+ major languages supported to translate your captions accordingly. Even if you made one video in English, for example, you can reach an even wider audience with translated captions.
There are also ways to create “bilingual” subtitles. This will involve two layers of subtitles, one for the main language and another for the target language.
Upload the SRT file to the Social Media Platform.
When you finish your captions in Filmora, use the Export SRT feature. An .srt file is a simple text document that contains your subtitles and their timestamps. When you upload an .srt file to YouTube or Facebook, the platform’s “crawlers” can read every single word you said. If someone searches for a keyword you mentioned in your video, your video is much more likely to show up in their search results.
After all, algorithms focus on content that will reach a wider audience, and adding SRT files helps the app understand that you’re serious about making your content more accessible to a global audience.
Conclusion
While the 80% rule is now reshaping the way people consume content, it’s best to think of ways to maximize this to your advantage. With auto caption generators and subtitling tools like Filmora making it so much easier to reach a wider audience, there is no excuse not to use them. Make sure to take advantage of auto caption tools to maximize your social media impact.
TOP ALTERNATIVES
 The Best Way to Recover WhatsApp Data on Android Without Rooting Your Phone
How to Buy Proxy with Credit Card: A Step-by-Step Guide
The Best Way to Recover WhatsApp Data on Android Without Rooting Your Phone
How to Buy Proxy with Credit Card: A Step-by-Step Guide
 From Samsung to iPhone: Transfer Your Photos in Minutes
 How to Transfer Apps from iPhone to Android
 How to Recover Lost Videos from Any Device (Even Corrupted Ones)
 The Ultimate Guide to Mac Data Recovery: Get Your Files Back on macOS
 FRP as a Double-Edged Sword: The Lockout Epidemic
 How to Remove iCloud Activation Lock the Right Way (Official Apple Methods)
 Running Out of Creative Ideas? Try an AI Image Generator From Image
 How To Use AI To Remove or Erase People and Objects From a Video